
How to use Python via Microsoft Azure on the Cloud
- Leandro Oliveira

- Nov 6, 2020
- 4 min read
Updated: Nov 7, 2020

Introduction
In this article based on Microsoft documentation, we will present step by step how to use python via Microsoft Azure cloud environment, detailing all the stages of the machine learning process and using a Microsoft repository on GitHub.
This content is part of the certification training for Microsoft DP-100 Data Scientist.
In addition to the content of Microsoft documentation, we will demonstrate the processes through sequencing, thus allowing greater detail of the process for greater understanding.
Explore data
Data exploration and analysis is typically an iterative process, in which the data scientist takes a sample of data, and performs the following kinds of task to analyse it and test hypotheses:
Clean data to handle errors, missing values, and other issues.
Apply statistical techniques to better understand the data, and how the sample might be expected to represent the real-world population of data, allowing for random variation.
Visualize data to determine relationships between variables, and in the case of a machine learning project, identify features that are potentially predictive of the label.
Derive new features from existing ones that might better encapsulate relationships within the data.
Revise the hypothesis and repeat the process.
Data scientists can use a variety of tools and techniques to explore, visualize, and manipulate data. One of the most common ways in which data scientists work with data is to use the Python language and some specific packages for data processing.
To complete the exercise, you'll need:
A Microsoft Azure subscription. If you don't already have one, you can sign up for a free trial at https://azure.microsoft.com/free .
An Azure Machine Learning workspace with a compute instance and the ml-basics repository cloned.
Create an Azure Machine Learning workspace
If you don't already have an Azure Machine Learning workspace in your Azure subscription, follow these steps to create one:
Sign into the Azure portal using the Microsoft account associated with your Azure subscription.
Select +Create a resource, search for Machine Learning, and create a new Machine Learning resource with the following settings:
Workspace Name: enter a unique name of your choice
Subscription: your Azure subscription
Resource group: create a new resource group with a unique name
Location: choose any available location
Wait for your workspace resource to be created (it can take a few minutes). Then go to it in the portal, and on the Overview page for your workspace, launch Azure Machine Learning studio (or navigate to https://ml.azure.com ), and sign in using your Microsoft account.
In Azure Machine Learning studio, toggle the ☰ icon at the top left to view the various pages in the interface. You can use these pages to manage the resources in your workspace.

Fig.1 Creating Workspace overview

Fig.2 Creating Workspace part 2

Fig.3 Workspace created
Create a compute instance
To run the notebook used in this exercise, you will need a compute instance in your Azure Machine Learning workspace.
In Azure Machine Learning studio , view the Compute page for your workspace (under Manage).
On the Compute Instances tab, if you already have a compute instance, start it; otherwise create a new compute instance with the following settings:
Virtual Machine type: CPU
Virtual Machine size: Standard_DS11_v2
Compute name: enter a unique name
Wait for the compute instance to start (this may take a minute or so)

Fig.4 Creating a compute instance.

Fig.5 Creating compute instance part2
Clone the ml-basics repository
The files used in this module (and other related modules) are published in the MicrosoftDocs/ml-basics GitHub repository. If you haven't already done so, use the following steps to clone the repository to your Azure Machine Learning workspace:
In Azure Machine Learning studio , on the Compute page, view your running compute instance.
Use the Jupyter link to open Jupyter Notebooks in a new browser tab.
In the Jupyter page, on the New menu, select Terminal. This will open a new tab with a terminal shell.
In the terminal shell, run the following commands to change the current directory to the Users directory, and clone the ml-basics repository, which contains the notebook and files you will use in this exercise: BashCopy cd Users git clone https://github.com/microsoftdocs/ml-basics
After the command has completed and the checkout of the files is done, close the terminal tab and view the home page in your Jupyter notebook file explorer. Then open the Users folder - it should contain an ml-basics folder, containing the files you will use in the rest of this exercise.

Fig. 6 Opening the Jupyter Part1

Fig.7 After you click on the icon Jupiter you will be derationed to the Jupiter web page.
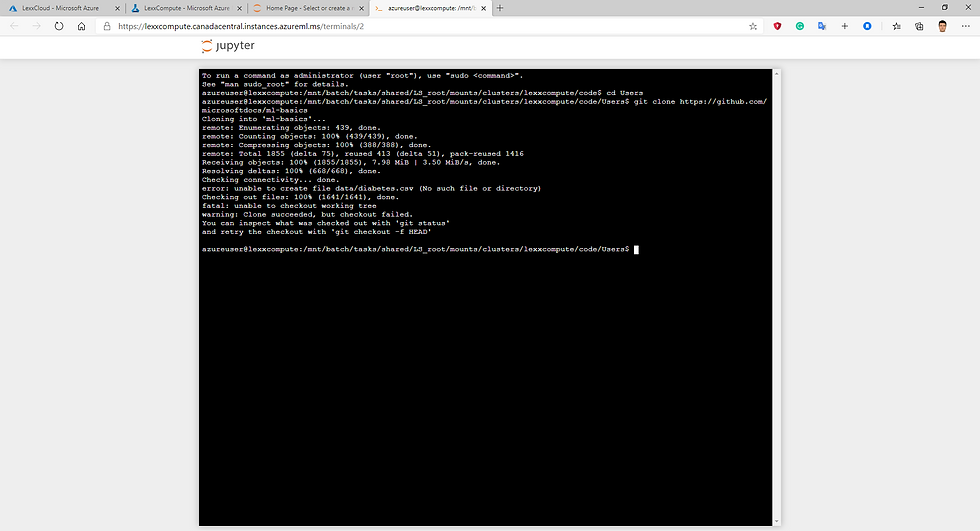
Fig.8 running the following commands to change the current directory to the Users directory, and clone the ml-basics repository.

Fig.9 The GitHub ml-basics imported.
Note
We highly recommend using Jupyter in an Azure Machine Learning workspace for this exercise. This setup ensures the correct version of Python and the various packages you will need are installed; and after creating the workspace once, you can reuse it in other modules. If you prefer to complete the exercise in a Python environment on your own computer, you can do so. You'll find details for configuring a local development environment that uses Visual Studio Code at Running the labs on your own computer . Be aware that if you choose to do this, the instructions in the exercise may not match your notebooks user interface.
Explore data in a Jupyter notebook
After you've created a Jupyter environment and cloned the ml-basics repository, you're ready to explore data.
In Jupyter, open the Data Exploration.ipynb notebook in the ml-basics folder and follow the instructions it contains.
Conclusion
Now that we have created our virtual machine in the cloud and opened the repository with the files on GitHub, we can follow the guidelines of every step by step on how to develop machine learning projects with examples of Regression, classification and Cluster.
In the link below you can continue step by step to develop machine learning projects for regression, classification and clustering with all Microsoft documentation and using the files in the repository.
https://docs.microsoft.com/en-gb/learn/modules/train-evaluate-regression-models/1-introduction
Comments