Machine Learning for Recommendation System
- Leandro Oliveira

- Nov 23, 2020
- 10 min read

Introduction
Reference companies in the e-commerce market use the benefit of recommendation systems as one of their main artificial intelligence tools, with approximately 30% of the revenues from these businesses being the result of the recommendation system.
The recent transformations in the consumer market, mainly post-pandemic, have directed a massive consumption of the e-commerce and, therefore, there is an exponential growth of this segment, such as the opening of new e-commerce businesses and transformation of physical trades in e-commerce and that is where The recommendation system assumes an increasingly important role in directing sales and sustaining the model of most businesses.
Therefore, given the importance and positive impact on revenues, it is considered to invest resources in this type of tool and even use cloud services with premium technical support.
Objective
The objective of this article is to develop a machine learning tool that will be part of a recommendation system development project within a macro context, where we will have other infrastructure projects integrated with this machine learning project.
This article describes the main characteristics of the recommendation system, the types of recommendation system, and presents the step by step of a real case of developing a recommendation system and the algorithm used with its respective accuracy and properties.
For this project we will use Azure Machine Learning by the Azure cloud, creating all the necessary cluster computing resources for data collection, processing, and deployment.
We will simulate a real scenario of deployment, however, as it is an article with an academic purpose without a budget to simulate a real production scenario, we will use a free account with an initial balance of 250 dollars for testing purposes. Therefore, in the production environment, it is limited and the resources available are resources with low production capacity and performance.
The recommendation algorithm that we will use was developed by Microsoft Research and trains a Bayesian recommender using the Matchbox algorithm.
The Matchbox model reads a set of triple user-item classification data and, optionally, user and item resources.
We can use the triennial model to make recommendations and find users or related items.
Recommendations can be of two types:
• Content-based: Uses resources for users and items.
• Collaborative filtering: Makes use of user and item identifiers and learns about the user based on the items classified by him and other users.
The matchbox is a hybrid system, as it uses a combination of collaborative filtering and content-based filtering. When the user is new, the model makes predictions based on the user's profile and after counting interactions, it is possible to make more personalized recommendations based on their ratings and not just their features, so a transition from an initial model based on in user characteristics , for more personalized recommendations based on collaborative filtering.
Further official information on the Matchbox model can be found at the official link below.
https://www.microsoft.com/en-us/research/wp-content/uploads/2009/01/www09.pdf
For testing the classification model we have the set of mandatory data below:
• The first column must contain user identifiers.
• The second column must contain item identifiers.
• The third column contains the classification of the user-item pair. Classification values must be numeric or categorical.
We can use the optional data regarding the characteristics of the user and the item based on content, however, for the purposes of processing efficiency and because it is an academic test environment with limited resources, we will develop our project based on the recommendation model of collaborative filtering, where the recommendations will be presented through the classification of the restaurant item by the user, therefore, after the classification of a restaurant item by the user, we will present personalized recommendations based on their preferences and in context with the preferences history of others users of our database used by our algorithm.
It is worth remembering that during the training process, only the triple data set for classifying user items are divided and the resources of users and items are not divided because there is no need.
It is important to remember that the number of characteristics of the users and selected items, as well as the number of iterations of the recommendation algorithm, that is, how many times the input data must be processed by the algorithm, influence the accuracy performance and the processing time of the model.
The matchbox model has a restriction that makes it impossible to carry out continuous training, so, good practices recommend to carry out periodic training considering new data to improve the model, which can be this quarterly period or according to the business need.
So, now we are going to start our process of developing our recommendation system by presenting the step by step, with a tutorial using the Azure cloud and the respective screenshots for a better understanding of the whole process by the reader.
Create an Azure Machine Learning workspace
To use Azure Machine Learning, you create a workspace in your Azure subscription. You can then use this workspace to manage data, compute resources, code, models, and other artifacts related to your machine learning workloads.
If you don't already have one, follow these steps to create a workspace:
Sign into the Azure portal using the Microsoft credentials associated with your Azure subscription.
Select +Create a resource, search for Machine Learning, and create a new Machine Learning resource the following settings:
Workspace Name: A unique name of your choice
Subscription: Your Azure subscription
Resource group: Create a new resource group with a unique name
Location: Choose any available location
Wait for your workspace to be created (it can take a few minutes). Then go to it in the portal.
On the Overview page for your workspace, launch Azure Machine Learning studio (or open a new browser tab and navigate to https://ml.azure.com ), and sign into Azure Machine Learning studio using your Microsoft account. If prompted, select your Azure directory and subscription, and your Azure Machine Learning workspace.
In Azure Machine Learning studio, toggle the ☰ icon at the top left to view the various pages in the interface. You can use these pages to manage the resources in your workspace.
You can manage your workspace using the Azure portal, but for data scientists and Machine Learning operations engineers, Azure Machine Learning studio provides a more focused user interface for managing workspace resources.
As we already have an account created, every time we log in, the authentication process is carried out by text message via cell phone.
This process increases security and as the expenses are paid-as-you-go, this process creates greater protection for the user's account.
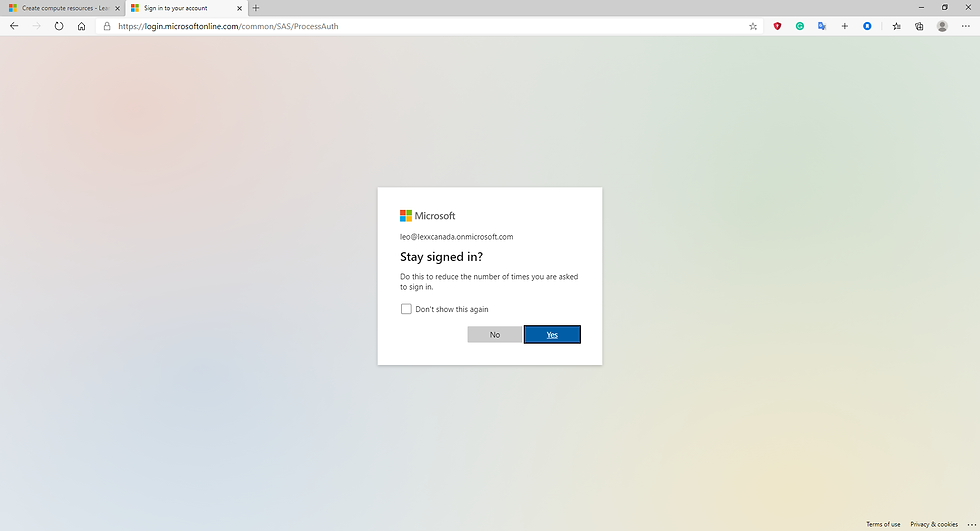
Fig.1 Signing the account created
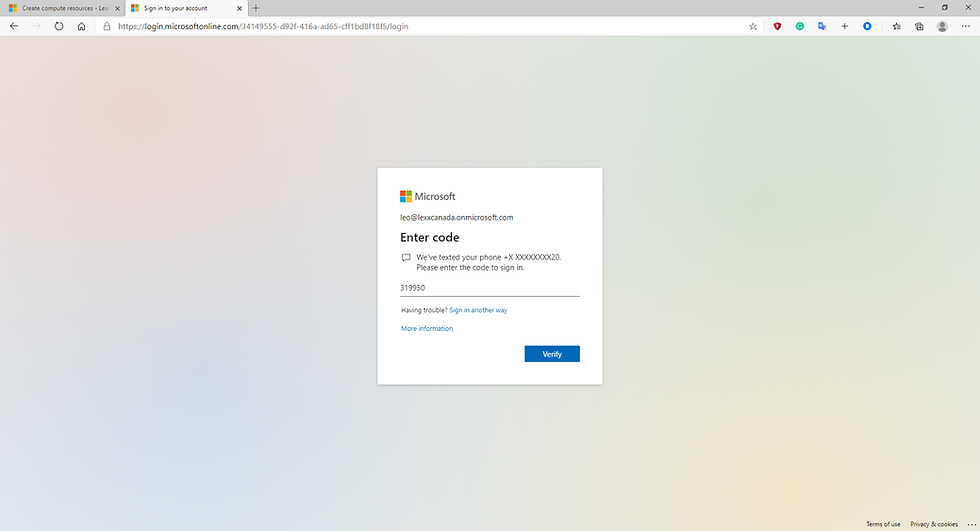
Fig.2 Entering the security code to access the account
In the production environment that we will present in the cloud, we will use cloud computing resources, following Microsoft's recommendations regarding virtual machines and their configurations, as we are using a free account that has only 250 dollars of credit.
This recommendation system does not update the new data in real time, therefore, the best practices recommend restarting the entire training process with new data every 3 months or as needed.
A reference implementation for Recommendations system is present below, but for academic proposes and how we are Woking using a free account, we are going to use a different infrastructure to run this project, using a virtual machine with 2 cluster and not spark by Azure Databricks and Azure SQL database instead Azure Cosmo DB.

Fig.3 Typical Infrastructure Environment
Create compute resources
After you have created an Azure Machine Learning workspace, you can use it to manage the various assets and resources you need to create machine learning solutions. At its core, Azure Machine Learning is a platform for training and managing machine learning models, for which you need compute on which to run the training process.
Create compute targets
Compute targets are cloud-based resources on which you can run model training and data exploration processes.
In Azure Machine Learning studio , view the Compute page (under Manage). This is where you manage the compute targets for your data science activities. There are four kinds of compute resource you can create:
Compute Instances: Development workstations that data scientists can use to work with data and models.
Compute Clusters: Scalable clusters of virtual machines for on-demand processing of experiment code.
Inference Clusters: Deployment targets for predictive services that use your trained models.
Attached Compute: Links to existing Azure compute resources, such as Virtual Machines or Azure Databricks clusters.
On the Compute Instances tab, add a new compute instance with the following settings. You'll use this as a workstation from which to test your model:
Virtual Machine type: CPU
Virtual Machine size: Standard_DS11_v2
Compute name: enter a unique name
Enable SSH access: Unselected
While the compute instance is being created, switch to the Compute Clusters tab, and add a new compute cluster with the following settings. You'll use this to train a machine learning model:
Virtual Machine priority: Dedicated
Virtual Machine type: CPU
Virtual Machine size: Standard_DS11_v2
Compute name: enter a unique name
Minimum number of nodes: 2
Maximum number of nodes: 2
Idle seconds before scale down: 120
Enable SSH access: Unselected
The first step in the process is to create the computing resources to use Azure Machine Learning. We will create the following resources below:
· Compute Instances: Development workstations that data scientists can use to work with data and models.
· Compute Clusters: Scalable clusters of virtual machines for on-demand processing of experiment code.
· Inference Clusters: Deployment targets for predictive services that use your trained models.
· Attached Compute: Links to existing Azure compute resources, such as Virtual Machines or Azure Databricks clusters.
The details of the configurations will be demonstrated through screenshots below:

Fig.4 Creating the Compute instance
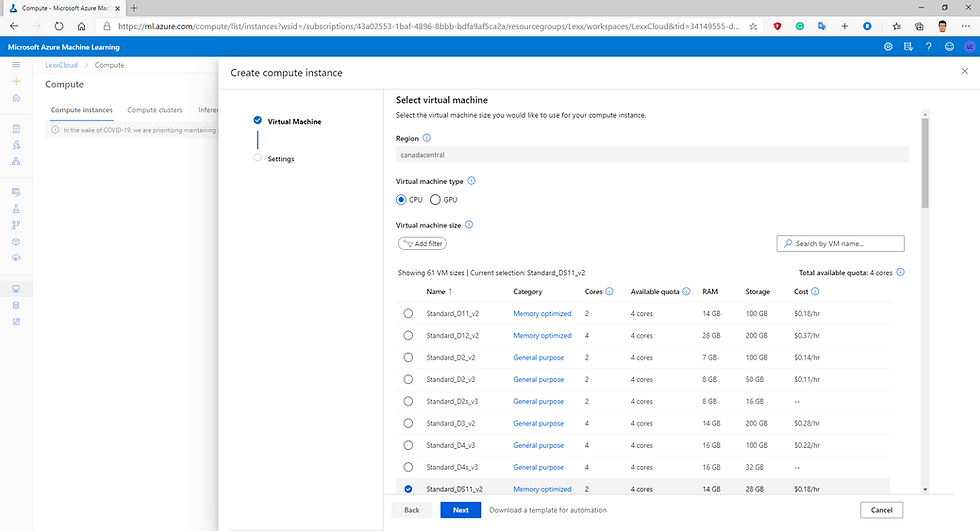
Fig.5 Compute instance configuration step 1.

Fig.6 Compute Instance configuration step2.
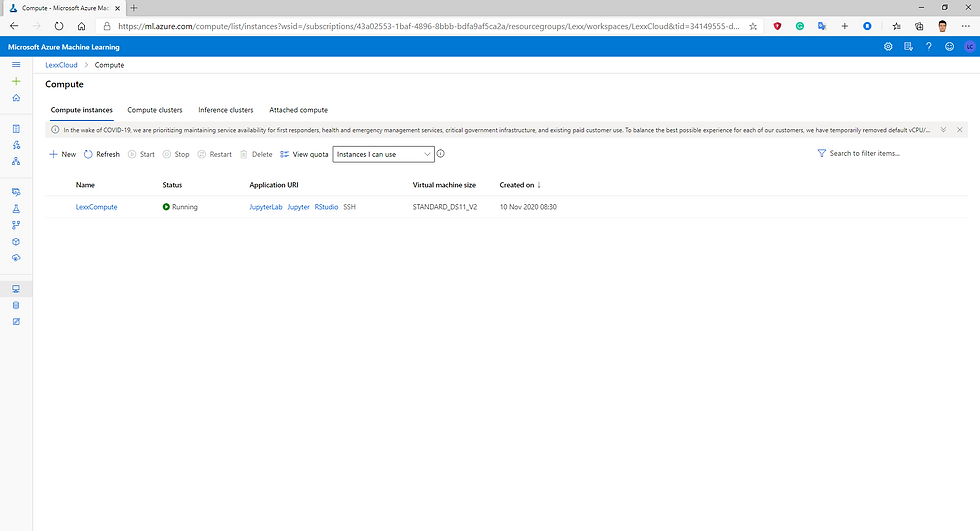
Fig.7 Compute Instance created and running.

Fig.8 Compute Cluster creation and configuration step1.

Fig.9 Compute Cluster creation and configuration step2.

Fig.10 Compute Cluster created and running.
Now we need to create the inference compute.

Fog.11 Creating the Compute Inference configuration step1.

Fig.12 Compute Inference configuration step2.

Fig.13 Compute Inference created.
Now we can start to develop the Machine Learning model using the compute resources that we have created before.
As we mentioned this process in the past using Azure Machine Learning Studio Classic, presenters the designer the final model.
Our model will make up to 5 restaurant recommendations based on the user's score. Based on this score from at least one restaurant, the model will make recommendations comparing the user's profile with other users who have had similar scoring behaviour. For this we will only use the input data with the user id, restaurant ID and the score which can be 0, 1 or 2.

Fig.14 Restaurant Rating with the history ratings.

Fig.15 Restaurant Rating result Visualization.

Fig.16 Restaurant Customer data and feature selections that presents the best accuracy.

Fig.17 Restaurant Customer Data Result Visualization.

Fig.18 Restaurant Feature data and feature selection.
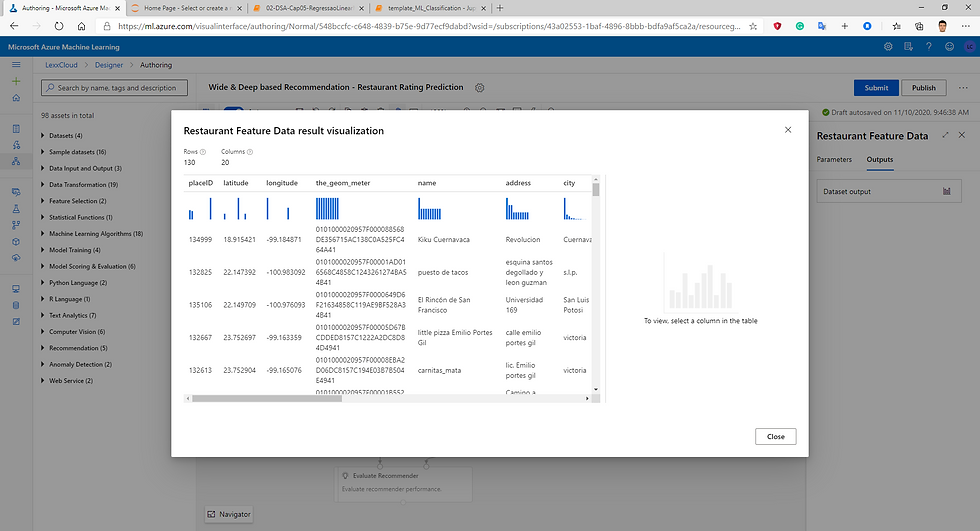
Fig.19 Restaurant Feature Data Result Visualization.

Fig.20 Selecting customer columns.

Fig.21 Selecting Restaurant columns.

Fig.22 Split Data Parameters -70% train and 30 test.

Fig.23 Creating the Experiment Pipeline and selecting the compute Inference with clusters.

Fig.24 Creating the Pipeline and Submitting the experiment.

Fig.25 Running the Experiment.

Fig. 26 Recommender Parameters.

Fig.27 Evaluate Recommender.
To deploy your pipeline, you must first convert the training pipeline into a real-time inference pipeline. This process removes training modules and adds web service inputs and outputs to handle requests.

Fig.28 Creating Real-time pipeline.

Fig.29 Creating Real-time pipeline step2.
Deploy a predictive service
After you've created and tested an inference pipeline for real-time inferencing, you can publish it as a service for client applications to use.
To publish a real-time inference pipeline as a service, you must deploy it to an Azure Kubernetes Service (AKS) cluster. In this exercise, you'll use the AKS inference cluster you created previously in this module.

Fig.30 Preparing to deploy.

Fig.31 Deploy: succeeded.
When you select Create inference pipeline, several things happen:
The trained model is stored as a Dataset module in the module palette. You can find it under My Datasets.
Training modules like Train Model and Split Data are removed.
The saved trained model is added back into the pipeline.
Web Service Input and Web Service Output modules are added. These modules show where user data enters the pipeline and where data is returned.
By default, the Web Service Input will expect the same data schema as the training data used to create the predictive pipeline. In this scenario, price is included in the schema. However, price isn't used as a factor during prediction.
Consume an Azure Machine Learning model deployed as a web service
Deploying an Azure Machine Learning model as a web service creates a REST API endpoint. You can send data to this endpoint and receive the prediction returned by the model.
You create a web service when you deploy a model to your local environment, Azure Container Instances, Azure Kubernetes Service, or field-programmable gate arrays (FPGA). You retrieve the URI used to access the web service by using the Azure Machine Learning SDK. If authentication is enabled, you can also use the SDK to get the authentication keys or tokens.
Now you can test your deployed service from a client application, following theses steps below.
On the Endpoints page, open the deploy-recommendation real-time endpoint.
1. When the deploy-recommendation endpoint opens, view the Consume tab and note the following information there. You need this to connect to your deployed service from a client application.
o The REST endpoint for your service
o the Primary Key for your service
2. Note that you can use the link next to these values to copy them to the clipboard.
3. With the Consume page for the deploy-recommendation service page open in your browser, open a new browser tab and open a second instance of Azure Machine Learning studio . Then in the new tab, view the Notebooks page (under Author).
4. In the Notebooks page, under My files, use the 🗋 button to create a new file with the following settings:
o File location: Users/your user name
o File name: Test-Recommendation
o File type: Notebook
o Overwrite if already exists: Selected
5. When the new notebook has been created, ensure that the compute instance you created previously is selected in the Compute box, and that it has a status of Running.
6. Use the ≪ button to collapse the file explorer pane and give you more room to focus on the Test-Recommendation.ipynb notebook tab.
7. In the rectangular cell that has been created in the notebook, paste the following code:

Fig.32 Creating new file using notebook.

Fig.33 Creating new file using notebook step2.

Fig.34 New file using notebook created.

Fig.35 In Endpoint we can find the REST API and the primary key.
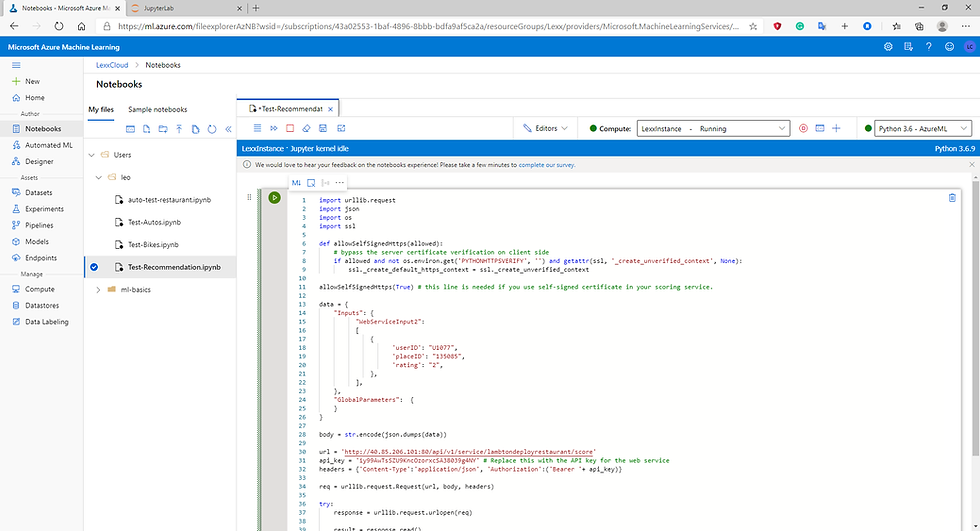
Fig.36 python code Test.

Fig.37 Testing the Recommendation System imputing data, simulating the real production scenario
Conclusion
In this project we present the step by step of how to develop a recommendation system and an approach to the concept of the theme in an introductory way and we demonstrate how to create the computing resources in the clouds to reproduce a real production scenario.
After these steps, the data engineer will be responsible for consuming the generated tokens so that the machine learning algorithm can be applied.
References
Recommender: Movie recommendation | Azure AI Gallery
Microsoft Certified: Azure Data Scientist Associate - Learn | Microsoft Docs
Tutorial: Deploy ML models with the designer - Azure Machine Learning | Microsoft Docs
ML Studio (classic): Train Matchbox Recommender - Azure | Microsoft Docs
Create client for model deployed as web service - Azure Machine Learning | Microsoft Docs
ML Studio (classic): Score Matchbox Recommender - Azure | Microsoft Docs
Matchbox: Large Scale Bayesian Recommendations - Microsoft Research
.NET AI/ML themed blogs: Building recommendation engine for .NET applications using Azure Machine
Learning | .NET Blog (microsoft.com)
Azure Machine Learning SDK for Python - Azure Machine Learning Python | Microsoft Docs
Create client for model deployed as web service - Azure Machine Learning | Microsoft Docs
Introduction to Azure Kubernetes Service - Azure Kubernetes Service | Microsoft Docs
Use Machine Learning and Cognitive Services with dataflows - Power BI | Microsoft Docs
ML Studio (classic): Train Matchbox Recommender - Azure | Microsoft Docs
https://www.microsoft.com/en-us/research/wp-content/uploads/2009/01/www09.pdf

Comments